The baking

Tag: cocoa

Four times the cake

There were five birthdays, all around the same time.

A cake was in order.

Two limitations.

One: I only have two cake pans and didn’t want to make three batches of cake to make five layers.

Two: A five layer cake – with five standard-ish layers of half a batch of cake batter each – would have been too tall fit in my cake carrier.

A four-layer cake it was.

Here’s what the final product looked like, covered in chocolate icing:

4-layer cake 4

Icing recipe and icing tips here and here.

Instead of just the usual chocolate cake – which seems to go over well with most people – I decided to alternate layers of chocolate cake with layers of vanilla cake.

The vanilla layers also had a pop of colour as a fun surprise.

For vanilla cake, follow all of the pan prep, pre-heating, and order-of-ingredients instructions on the cake post linked here and above. And, for ingredients:

-2 1/4 cups all-purpose flour

-1 cup sugar

-1/2 cup oil, I used canola oil

-1 1/2 cups water – you can use another liquid, like coffee, but be careful about flavour and viscosity and, you know, common sense and obvious stuff

-1 teaspoon salt

-2 tablespoons cornstarch or arrowroot powder

-3 1/2 teaspoons baking powder

I used purple food pigment gel to dye the vanilla layers purple.

A note about water: Gradually add additional water or another liquid to the batter before baking if it is too thick. I find that the ideal cake consistency is somewhat like that of a thick syrup. Think chocolate. Or maple. For this cake, I started with 1 1/2 cups water and added a little additional water, about 1/4 – 1/2 of a cup – after the ingredients had been mixed and blended.

Mix all ingredients together in a large bowl and blend with a mixer, hand or electric, for about two minutes. Remember to stop and scrape the sides of the bowl.

Pour into greased and floured cake pans and bake at 350 degrees for about 30 to 35 minutes – or until a toothpick stuck into the centre of the cake comes out clean.

Remember that, once baked, cake needs to fully cool before being removed from cake pans. If, like I do, you have a limited number of cake pans, you need to let each batch of cake you bake cool fully before removing it from the pans and baking a new batch.

Here’s the fully-cooled and ready-to-ice cake, sitting on my cake carrier base to make sure it wasn’t too tall to fit:

4-layer cake 2

And a close-up of the texture of both the vanilla and chocolate layers:

4-layer cake 1

These pieces came from the trimmings I made on the top of some of the layers to flatten them and make them fit more closely together.

And another close-up of the final product:

4-layer cake 3

This cake did get a bit of additional icing decoration – but that happened on-location, not in my kitchen – and a picture didn’t happen.

The cake was thoroughly nom’d.

Cheers.


Baking, on The Baking

It’s been a while since I posted.

But I have been baking things.

One of the things I baked was a batch of cupcakes.

Chocolate on chocolate.

I used the usual recipes – slightly modified, of course – for the cake itself and for the icing.

The main modification was that I added a little bit of coconut flour – for flavour – to the cake batter.

I also used coconut flour in the icing.

For decoration, I opened up and tried a vial of edible glitter – in gold – that I’d picked up but hadn’t gotten around to using.

Cupcakes, chocolate, coconut, glitter: all rather fabulous.

And here the cupcakes are:

coo kies 8

And that is indeed a custom The Baking cutting board.

Banana-blueberry muffins

I made banana bread again.

Banana bread is, generally, a good thing.

This time, I modified my basic banana bread procedure and used about 3/4 of a cup of frozen blueberries along with 1/4 of a teaspoon of ground cloves.

The final result, displayed on a cupcake tree:

banana blueberry muffins

Most excellently delicious.

And remember the freezer trick if you want to make the bananas easier to deal with.

Cake, cones, whiskey

wskckcone4

These are chocolate cake cupcake cones, with whiskey-vanilla icing.

I’m actually not big on using alcohol as a baking ingredient – I find that you can’t always taste it in the finished product – but I decided to try whiskey icing anyway. I like to experiment with baking.

The icing tasted good, but I couldn’t always taste the whiskey. Other people who tried the cupcakes said that they could taste the whiskey. So, that’s that.

Anyway, to add a little colour to the finished product, I decided to use coloured ice cream cones to bake these cupcakes in. Most grocery stores sell flat-bottom ice cream cones in packs that have a mixture of plain/yellow-ish, pink, and brown – chocolate? – cones.

The pink cones looked like this:

wskckcone1

And the brown cones looked like this:

wskckcone2

Now for the how-to:

I used the chocolate cake recipe that I used here. I used a modified version of the icing recipe that I used for the same project. The modifications to the icing recipe were that I didn’t use food colouring and that I used whiskey as the non-vanilla liquid ingredient.

For getting the cake into the cones and baking them, I suggest following the procedure I wrote about here.

And here’s one more close-up of the very much finished and very much delicious cupcake cones:

wskckcone3


Experiments in banana bread

I’ve been doing some experimentation with banana bread as of late.

Of note – and of which I have pictures – are a batch of banana-blueberry-flax muffins and a spiced tea banana bread loaf.

For both the muffins and the loaf, I used the basic banana bread procedure outlined here. And I prepared the bananas using the freezer trick that I described in a previous post. If you don’t have time for the freezer trick, a good way to get very ripe bananas can be to check out the reduced-for-quick-sale produce section at grocery or fruit stores.

Here are the banana-blueberry-flax muffins:

blueberry muffins with banana and flax2

I went through the regular procedure and ingredients for the banana bread recipe linked above, but, after all of the other ingredients were mixed, I added about one cup of frozen blueberries and about 1/3 of a cup of ground brown flax seeds.

I ground the flax seeds with a coffee grinder. You could use whole flax seeds if you want to; I felt like using ground flax seeds. As for the blueberries, I’d suggest using frozen blueberries as they are often cheaper than fresh blueberries and, because they are frozen, they’re likely to keep longer than fresh blueberries.

The spiced tea banana loaf was a completely random idea that I had and decided to make happen.

I started out by boiling water in a kettle. And, then -and this served as the liquid called for in the recipe – I measured out about one cup of boiling water and poured the water into a bowl. Then, I added five regular old Earl Grey tea sachets to the bowl of water. I made sure that the tea sachets were completely immersed in the water.

I let everything sit for about ten minutes. Then, I removed the tea sachets from the water and added some spice. For spice I used about one teaspoon of ground cinnamon, half a teaspoon of ground nutmeg, half a teaspoon of ground ginger, and about one quarter of a teaspoon of ground cloves.

Because I felt like it, I added about half a teaspoon of cocoa powder to the mixture.

I added the bananas to the liquid and spice mixture at this point.

And, then, I continued, with the rest of the banana bread recipe.

The result, the lovely spiced tea banana bread loaf pictured below:

chai tea banana bread

This banana bread turned out moist, dense, and delicious, with an excellent balance of spice and flavour. Highly-recommended, and I may try spiced tea banana bread again with a different kind of tea.

I also recently tried making a chocolate cake – using the basic chocolate cake recipe I wrote about here – with a whole banana mixed into the batter. The cake was delicious, but the chocolate flavour seemed to overwhelm the banana flavour and there was really no telling that there was any banana content in the cake.

I’m somewhat curious as to how adjusting banana and chocolate content may affect the texture of the cake that that cake recipe produces, so I may continue to play with that recipe.

Or maybe I won’t.


A cake stadium for that football bowl event

On the Sunday that most recently happened, there was a major football event that happened.

This – a chocolate cake decorated with icing, candy, cookies, caramel corn, and pretzels to look like a football stadium – also happened:

snack stadium cake 2

That’s right: you are looking at a not-at-all-to-scale cake version of a football stadium. Some might also refer to such a thing as a snack stadium.

For the cake, I used the same chocolate cake recipe that I used here.

Same link for the icing, but halve the recipe and use green food pigment dye.

I used a small amount of white icing for the yard lines.  You can make a separate batch, set aside some un-dyed icing, or buy a small tube of prepared white icing.

I baked the cake in a rectangular baking pan – the same one that you can see in the picture above. That’s right: the cake was baked, transported, and decorated in one pan.

The goal posts were made from long, red, gummy candy and were held up and together by toothpicks. I pushed the toothpicks right into the centre of the gummy candy, which took some effort – and a bit of trial and error. You might want to experiment with using licorice, breadsticks, preztels, or, perhaps, something non-edible such as pipe-cleaners as goal posts.

All of the candy, pretzels, caramel corn, teddy bear cookies, and other decorations came from a bulk food store.

A cake version of a football stadium can be a fun treat to bring to a football-watching party. You can even – as I did – bring the cake to the party iced, but not decorated, set out the decorations, and let other people at the party help decorate the cake.

Here’s one last close-up of the teddy bear cookie players on their football cake field – with bags of decorations in the background:

snack stadium cake 1

You can also make a snack stadium from guacamole, salsa, chips, and other crunchy snacks. Try looking up “snack stadium.” There are some rather fascinating snack stadiums to be seen. But I thought it’d be fun to make a baked, cake version.

Fun it was. And delicious to boot

Remember those convenience-store cupcakes?

These cupcakes are a nod to a certain brand of packaged cupcakes often found in convenience stores.

chocolate cupcakes3

These cupcakes likely  have a shorter shelf life than the packaged version. But they were consumed rapidly enough that shelf life really wasn’t much of an issue.

I used the same moist, dense, and choclate-y chocolate cake batter recipe that I used for this cake and these other cupcakes. For the icing filling and top-of-cupcake decoration, I used the icing recipe that I used for this cake.

I baked the cupcakes the day before filling and decorating them. Cake tends to be crumbly when it’s super-fresh – or not fully cooled – and I wanted to be able to make holes in the centres of the cupcakes without destroying the cupcakes

Holes in the centres of the cupcakes – each of which was filled with about a tablespoon of icing – were made with this lovely cupcake-corer device:

chocolate cupcakes4

Here’s another view of the corer beside a just-filled-with-icing cupcake:

chocolate cupcakes2

The pieces of cupcake that were cored out were squished back into place on top of the filling.

Then, each cupcake was covered with a few spoonfuls of chocolate ganache.

For the chocolate ganache topping, I used a modified version of a recipe from a cupcake recipe book I have. I used:

-1 1/4 cup soy milk – you could substitute another milk-like beverage if you’d like

-1 package semi-sweet chocolate chips

-2 tablespoons brown sugar

Mix the milk beverage and the brown sugar together in a pot and bring to a boil. As soon as the liquid starts boiling, remove the pot from the heat source. Add the chocolate chips to the mixture immediately and stir – with a heat-safe spatula – until thoroughly blended. Let the mixture cool away from the heat source.

The ganache topping should remain relatively liquid and easy to spread for quite some time as it cools. The texture and thickness will likely be somewhat pudding-like. It should eventually cool and solidify to a, well, chocolate ganache-like state that is more solid.

Once the cupcakes had been topped with ganache – and the ganache had slightly cooled – I loaded up my icing gun with the same icing that used for the cupcake filling. I used a small, round opening, icing tip to make a loop-y line across the top of each cupcake.

And that’s that.

Chocolate cake cones

Once again, cupcake cones, delicious chocolate cupcake cones with chocolate icing:

choc cupcake cones

These cupcake cones are actually from quite a while ago. Chocolate on chocolate is a delicious variation on cupcake cones that I thought worth sharing.

I used the exact same recipe for chocolate cake that I used for this cake and this cake. Then, I poured the batter into flat-bottom ice cream cones and baked the cones in the oven. More instructions here.

For the icing, I used pretty much the same icing recipe that I used in both of the linked cake recipes. I added about 1/4 of a cup of cocoa powder to the icing mix at the same time as the shortening and margarine. And I didn’t use any food colouring.

To ice the cupcake cones, I used a spoon to fill my icing gun with frosting. I used a large, star-shape, icing tip to put swirls of chocolate icing onto each cupcake cone.

Pie inside a cake

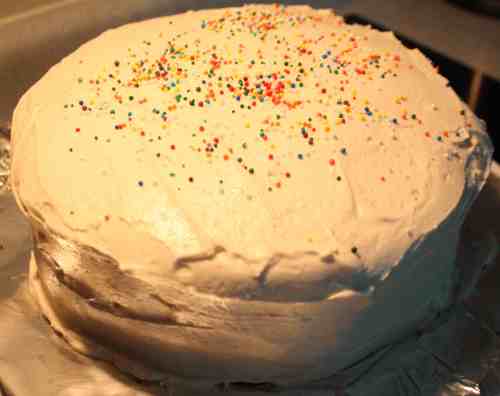
Yes. Correct. This is a delicious, double-layer chocolate cake with an apple pie  inside it.

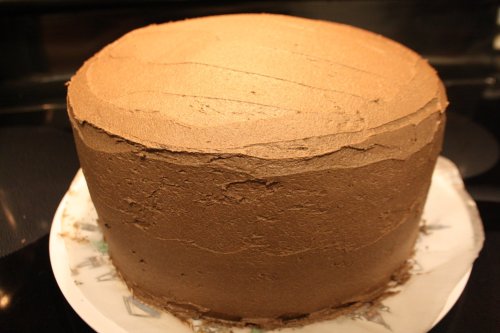
Here is the outside of the finished product:

cakepie5

I got the idea from pictures I had come across of cakes with apple and or pumpkin pies baked into them.

Anyway.

To cut down on baking time, I decided to buy a small apple pie from the bakery section of a grocery store.

You could also make your own pie.

If you make your own pie, I suggest checking out my previous posts on pie, pie, and pastry. Also, it would probably be a good idea to let the pie cool completely before baking it into a cake.

This is the pie I used:

cakepie3

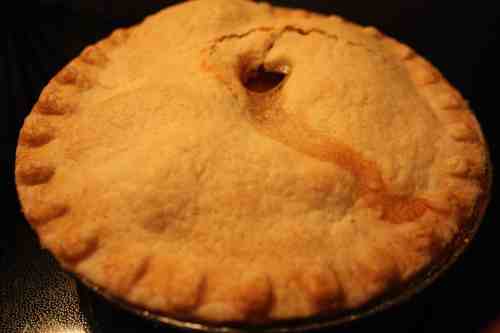
I got the smallest pie I could find in the bakery section at the store. The pie was apple-cinnamon and it was about 6 inches or so in diameter.

Next, I made a batch of chocolate cake batter. I used the same recipe that I used to make an 80s video game-theme chocolate cake in this post.

But, instead of making you click, here’s the recipe for the cake:

Preheat oven to 350 degrees and prepare the cake pan or pans that you’d like to use by lightly greasing the inside surfaces with margarine or shortening. Then, coat the greased pan insides with a light layer of flour. I used two round cake pans to make this cake.

In a bowl, mix:

-3/4 cup canola oil

-1 1/2 cups sugar – I usually use regular fine grind white sugar

-1 1/2 – 2 cups water or another liquid – I usually add around 2 cups liquid total and sometimes use chilled coffee instead of water. More water – as long as you don’t add too much, makes the finished cake more moist and dense.

-1 teaspoon salt

-3 teaspoons vanilla extract or another liquid flavour extract. Vanilla sugar also works.

-2 tablespoons cornstarch or arrowroot powder

-1 1/2 teaspoons baking powder

-1 teaspoon baking soda

-2/3 cup cocoa powder

-2 1/4 cups all-purpose flour – I usually use all-purpose unbleached wheat flour

Beat all ingredients together for about two to three minutes or until fully blended and the desired consistency. The consistency you should be aiming for is somewhere between a thick soup and pancake batter. Gradually add small quantities of water or another liquid if the batter is too thick. Remember to stop and scrape the sides and bottom of the bowl with a spatula a few times so that everything is mixed together.

-Next: time to put the pie into one of the cake pans.

If you baked a pie, make sure that it is fully cooled. Yes, you will have to make your pie – or pies [?] – ahead of time. That’s part of why I decided to buy a pie instead of making one.

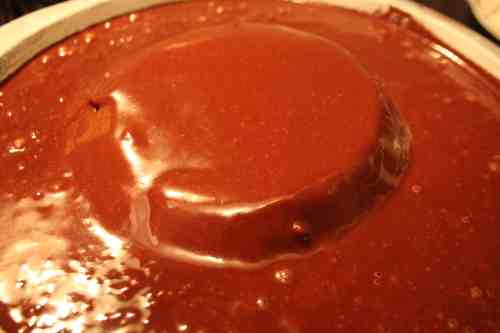
Anyway: carefully remove the pie from the pan it was baked in and transfer it to one of the cake pans. I decided to – in interest of making less of a mess of the pie – simply put the pie upside down into one of the cake pans and carefully lift away the aluminum pie tray.

Then, I poured chocolate batter into the pan and over the pie. I used about two thirds of the cake batter in the cake pan with the pie in it. And I poured the other third of the cake batter into a second cake pan.

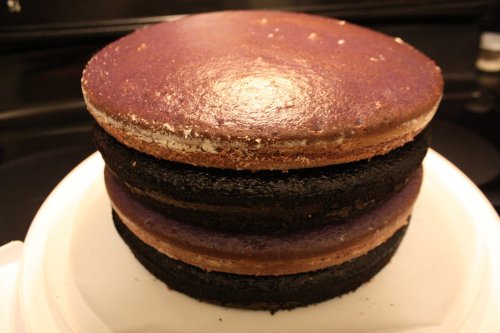
This is what the cake pan with the pie in it looked like right before going into the oven:

cakepie2

Once the cake pans are in the oven – you can bake both side-by-side if there is room in your oven – bake them for about 30 to 45 minutes or until a wooden toothpick stuck into the centre of the cake comes out without any batter sticking to it. For the tray with the pie in it, try to check if the cake is ready somewhere in the centre of an area that is mostly cake.

Remove the pans from the oven and cool on a wire rack.

Fun icing fact: it is not a particularly good idea to ice a cake – or cupcakes – before it is fully cooled.  It’s also easier to remove cake from cake pans when the cake is fully cooled.

I made vanilla-cardamom icing for this cake.  I added a little more liquid – both vanilla extract and almond milk – than I would usually use so as to make a lighter, fluffier version of buttercream-style icing.

To make the icing:

-1/4 cup of margarine – use a margarine that is firm like butter when it’s stored in the fridge. I usually use Earth Balance brand margarine.

-1/4 cup of shortening – You could also use either 1/2 cup of margarine or 1/2 cup of shortening instead of both shortening and margarine. When measuring shortening, it’s helpful to remember that most vegetable shortening is sold in boxes with cut lines/measurements printed on them. You can use the cut lines as a guide to measure shortening when adding it. And you can use the size of the cut piece of shortening to estimate how much margarine to use. It also helps to bring the margarine and/or shortening to room temperature before using it to make icing.

-1/2 cup liquid – I usually use coffee or soy milk. I have also used beer or whiskey. Pretty much any consumable liquid could be used. I used almond milk this time – and a little more than half a cup

-2 teaspoons liquid vanilla extract or other flavouring. You could also just use more of whatever other liquid you are using. I used about three teaspoons of vanilla extract this time.

-1 teaspoon ground cardamom/cardamon

-4 to 6 cups icing sugar

Mix the margarine and shortening together until well-blended. If you want to use food colouring, add the  food colouring at this stage.

Add about half of the icing sugar and mix.

Add the liquid and the flavour extract.

Mix.

Gradually add more of the icing sugar. Mix and add more icing sugar until the icing is of the consistency and thickness you’d like.

I usually use an old-school hand-powered egg beater to mix icing, but you could also use and electric beater or stand mixer.

To ice the cake, I spread a thin layer of icing on top of one layer of cake – I used the cake without the pie in it on the bottom – and then put the other layer of cake on top of the first layer. Then, I used a butter knife and a spatula to spread icing over the top and sides of the two layers. Then, some rainbow sprinkles happened.

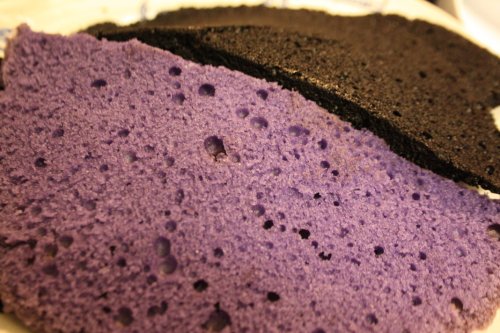
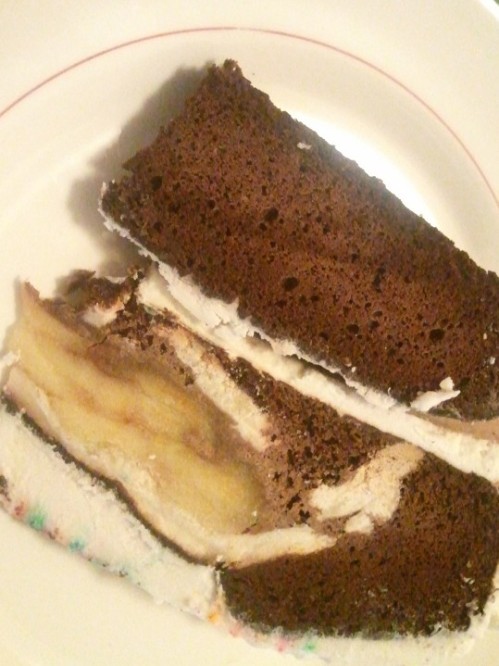
It’s pretty cool to cut into a cake and see apple pie inside one of the layers. Check out this fabulous and hastily-taken, on-location, picture of a slice of the cake:

WP_001528

I think that a cake with a pie inside would work with vanilla or white cake as well. And I think that it would also work with other pies with fruit filling or other relatively solid filling – like the pumpkin pie cakes found online.

It was discussed whether it would work to bake a pecan pie inside a cake, but I’m not quite sure whether a pecan pie would stand up to being re-baked.  Though I may have give a baking a pecan pie into a cake a try – for baking science and all.

Chocolate-chocolate chip banana muffins

Banana bread again – and I’ll keep it short.

These are chocolate-chocolate chip banana muffins:

chocolate chocolate chip muffins

And they were delicious.

I based the batter on the same ingredients that I used to make banana bread cupcake cones in a previous post. But I added about two tablespoons of cocoa powder to the batter and used a bit less spice.

I also sprinkled the tops of the muffins with semi-sweet chocolate chips before baking.

Banana and chocolate work well together. And this recipe would work to make muffins or banana bread. Or cupcake cones. Or whatever banana bread-like baking you may want to make.

And, yes, that is indeed a heart-shape muffin tray.